Electromagnetic induction : moving coils—stationary fields, moving fields—stationary coils and fleming’s left-hand rule for generators
Electromagnetic Induction
18–1 MOVING COILS—STATIONARY FIELDS
A simple way of demonstrating the induction process is shown in Figure 18–1. A piece of copper wire is connected to the terminals of a sensitive meter and moved

downward through a magnetic field, the wire cutting across the lines of force. While the wire is moving, a voltage, or emf, is produced, tending to drive electrons from A toward B. This emf induced by the movement of the wire across the field produces a current if a complete circuit exists. When the magnet and wire are kept stationary, no emf is produced; motion is necessary. A strong horseshoe magnet (preferably Alnico) should be used. The meter can be a millivoltmeter, milliammeter, microammeter, or galvanometer, preferably a zero-center type.
When the wire is moved upward through the magnetic field, Figure 18–2, the meter needle is deflected in the direction opposite to its previous motion. This change shows

that the induced emf and induced current have been reversed in direction. If the wire is repeatedly pumped up and down, the pointer on the meter will fluctuate from left to right, indicating the generation of alternating current (AC).
When the wire is moved endwise through the field, as from A to B and back again, no emf is produced. If the wire is moved in a direction parallel to the lines of force, as from S toward N or N toward S, no induced emf is generated. The wire has to move so that it cuts across the lines of magnetic force. This cutting is a quick way of describing the motion that must occur if any voltage is to be produced. (No one need be concerned about any damage to these imaginary lines during the cutting process, for the field is just as strong after the wire has passed through as it was before.)
The induction process is greatly enhanced if the wire is shaped into a coil. Remember, to generate a useful voltage, we can move a coil through a magnetic field.
18–2 MOVING FIELDS—STATIONARY COILS
Up to this point, we have discussed generation of voltage by moving wire so that it cuts across a magnetic field. Actually, it is often just as practical to produce emf by moving the magnetic field so that it cuts across stationary wires.
An emf is produced in a stationary coil, as illustrated in Figure 18–3, when a bar magnet is withdrawn from, or inserted into, the coil so that the lines of force, moving with the magnet, cut across the wires of the coil.
The results of this experiment can be changed by using various magnets of different strength, and/or coils that differ in their number of turns. The results then demonstrate that a greater voltage output can be obtained by using a stronger magnet and/or coils with more turns.

Furthermore, the experiment reveals that the amount of voltage output depends on the speed at which the magnet is moved. The faster the motion, the more emf is produced.
These results can be summarized as follows:
The amount of emf induced is proportional to the product of three factors that deter- mine the rate of cutting magnetic flux, namely:
• The number of lines of force
• The number of turns of the wire
• The speed of the motion of wires through field or field through wires
When lines of force are cut by wire coil, the relationship of voltage measurements to magnetic field measurements is this:
To produce 1 volt, the wire must cut 100,000,000 lines of flux per second.
Recalling that 100,000,000 lines of flux are called a weber, we can state that
Cutting 1 weber/second results in the generation of 1 volt.
For instance, when 50,000 lines of force are cut by a coil of 2,000 turns in 1 second, the total cutting is 50,000 3 2,000 5 100,000,000 lines per second, and 1 volt is induced.
EXAMPLE 18–1
Given: 300,000 lines of flux cut by a coil of 5,000 turns in 2 seconds.
Find: The value of the induced emf.
Solution
The total number of lines cut in 2 seconds is equal to

All generators operate on this principle of cutting flux lines with the relative motion of magnetic fields and coils of wire. Remember, cutting 100,000,000 lines of flux per second generates 1 volt.
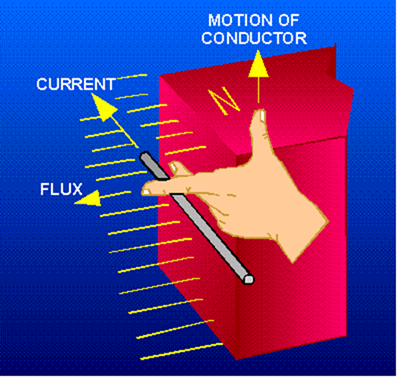
18–3 FLEMING’S LEFT-HAND RULE FOR GENERATORS
The relation of direction of motion of the wire in a field to direction of induced emf can be determined by Fleming’s left-hand rule. With the thumb, forefinger, and middle finger of the left hand each placed at right angles to the other two fingers, as shown in Figure 18–4, the f orefinger (or f irst finger) gives the direction of the f ield, the thumb gives the direction of motion of the wire, and the center finger gives the direction of the induced current. This rule does not explain anything; it is merely one of the ways of determining one of these directions when the other two are known.
One way of remembering this rule is to associate the first letters of the fingers used with the first letters of the indicated quantity.
THumb stands for THrust Forefinger stands for Flux Center finger stands for Current
If you think you understand this concept well, look back at Figures 18–1 and 18–2. Look carefully at all the arrowheads indicating the various directions of field, current, and conductor motion to see if you can verify the correctness of the information presented in these drawings.
Now let us apply this left-hand rule to find the direction of current flow in the coil of Figure 18–5 when the magnet is withdrawn from the coil.
Figure 18–5 shows the withdrawal of the magnet from the coil. The magnetic field of the N pole is moving to the right, cutting across the wires of the coil. To determine the direction of induced emf using the left-hand rule, remember that the rule is based on the relative motion of the wire. Pulling the magnet to the right is equivalent to moving the coil of wire to the left. To use the left-hand rule, the thumb must point to the left, representing the relative motion of the wire through the field.


To find the direction of emf over the top of the coil, the thumb points to the left, the forefinger (for field) upward, and the center finger then gives the current direction toward the observer at the top of the coil. At the bottom of the coil, the thumb still points to the left, the field is downward, and the center finger points away from the observer, giving the current direction around the coil as shown by the arrows on the wire in Figure 18–5.