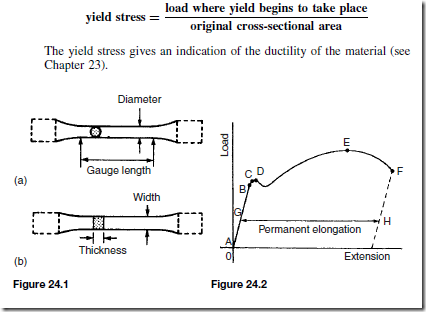
A tensile test is one in which a force is applied to a specimen of a material in increments and the corresponding extension of the specimen noted. The process may be continued until the specimen breaks into two parts and this is called testing to destruction. The testing is usually carried out using a universal testing machine that can apply either tensile or compressive forces to a specimen in small, accurately measured steps. British Standard 18 gives the standard procedure for such a test. Test specimens of a material are made to standard shapes and sizes and two typical test pieces are shown in Figure 24.1. The results of a tensile test may be plotted on a load/extension graph and a typical graph for a mild steel specimen is shown in Figure 24.2.
(i) Between A and B is the region in which Hooke’s law applies and stress is directly proportional to strain. The gradient of AB is used when determining Young’s modulus of elasticity (see Chapter 23).
(ii) Point B is the limit of proportionality and is the point at which stress is no longer proportional to strain when a further load is applied.
(iii) Point C is the elastic limit and a specimen loaded to this point will effectively return to its original length when the load is removed, i.e.
there is negligible permanent extension.
(iv) Point D is called the yield point and at this point there is a sudden extension with no increase in load. The yield stress of the material is given by:
(v) Between points D and E extension takes place over the whole gauge length of the specimen.
(vi) Point E gives the maximum load which can be applied to the specimen and is used to determine the ultimate tensile strength (UTS) of the specimen (often just called the tensile strength)
(vii) Between points E and F the cross-sectional area of the specimen decreases, usually about half way between the ends, and a waist or neck is formed before fracture.
The percentage reduction in area provides information about the malleability of the material (see Chapter 23).
The value of stress at point F is greater than at point E since although the load on the specimen is decreasing as the extension increases, the cross-sectional area is also reducing.
(viii) At point F the specimen fractures.
(ix) Distance GH is called the permanent elongation and
For example, a rectangular zinc specimen is subjected to a tensile test and the data from the test is shown below. Width of specimen 40 mm; breadth of specimen 2.5 mm; gauge length 120 mm.
Fracture occurs when the extension is 5.0 mm and the maximum load recorded is 38.5 kN.
A load/extension graph is shown in Figure 24.3
The limit of proportionality occurs at point P on the graph, where the initial gradient of the graph starts to change. This point has a load value of 26.5 kN.
Stress at the limit of proportionality is given by: